
Quilt Border Tips
About BordersAdding Borders to Your Quilt
- Directions For:
- Plain Borders with Straight-sewn Corners
- Borders with Mitered Corners
- Pieced or Patchwork Borders
About Borders
Frame your Art Work.Borders can:
- Act like a frame on a picture, giving visual boundaries to the central design and containing it.
- Enhance and emphasize the central design.
- Coordinate with and bring out a particular color from the center.
- Enlarge a quilt without making more unit blocks.
- Width of the border(s) should enhance but not be so large as to visually outweigh the central quilt design.
- The scale, or size of the pieces and motif, or shape of border pieces, should echo or be similar to those in the rest of the quilt when using a pieced border.
- The color of the outside border will tend to bring out that color from the center of the quilt, especially when there are approximately equal amounts of several colors in the interior of the quilt.
Types of Borders
- Plain with straight-sewn corners
- Plain with mitered corners
- Multiple plain strips with mitered corners
- Patchwork (pieced or appliquéd)
- Any combination of the above
Plain borders are simply ones that are not pieced. They may, look quite fancy if a border print is used but the corners must be mitered to make the design turn the corner gracefully. Mitered corners are still fairly simple to construct.
| Border Illustrations | |
) |
) |
| Borders With Corner Stone and Straight Sewn Corners | Border with Straight Sewn Corner |
) |
) |
| Mitered Striped Border and Pieced Picture Panel Border separated by Straight Sewn Solid Color Borders | Pieced Outer Border with Straight Sewn Inner Border |
) |
) |
Pieced Border |
Multiple Border Types |
) |
) |
Applique Border with |
Pieced Border |
Squareness and Accuracy Count!
The time you spend learning to add borders with accuracy will pay off in a more beautiful quilt.
If attached without care, borders may become longer than the quilt itself (the edge of the quilt tends to stretch if you simply place a border strip along the outside edge of the quilt and begin sewing. That extra length causes waviness in your border which may result in puckered or tucked sections in your quilt. Wavy borders also limit what types of border designs can be stitched in them and still have them look as intended. OK, enough said? What to do
Adding Borders to Your Quilt
General Guidelines:- Borders should be cut in length to fit the center of the quilt.
- Cut border strips longer than you think you will need and later trim them to the exact measurement needed after the center of the quilt has been pieced and measured.
- The quilt needs to end up square with 90° corners.
- Top and Bottom dimensions should be equal.
- The two Side dimensions should be equal.
- It is not unusual to need to ease one side of a quilt to fit the border and stretch the opposite side slightly to fit the same dimension. Again, to keep the quilt square, both side borders must be cut the same length and the top and bottom borders must the same dimension as each other.
These four points are the KEYS to FLAT BORDERS. - Cut borders from the lengthwise grain if at all possible.
- Cutting from the length of the fabric means you do not have to piece the border.
- The lengthwise grain is more stable so the border will have less stretch than borders cut on crosswise grain.
- If you have multiple borders and it is too expensive to buy enough fabric to cut them all on the lengthwise grain, try to at least cut the outer border of the quilt on the lengthwise grain to stabilize the outer edge. Inner borders can be cut cross-grain.
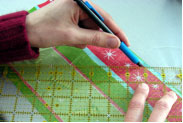
- If you need to piece your border fabric for the correct length border, 45° angled seams may be less noticeable than seams sewn at right angles to the fabric. Place right sides together and sew at an angle, as illustrated below. Check after sewing by unfolding into one long strip. If the seam is correct, trim off the corners leaving a ¼ seam allowance. Press the seam open.
)
DIRECTIONS FOR:
(1) Plain Borders with Straight-sewn Corners
Plain borders are simply borders that are not pieced patchwork.
MEASURING for "WAVE-FREE" Borders:
Side Borders -
- Measure through the center of the quilt from top to bottom, including seam allowances. Measure from top to bottom again on either side. Use the shortest of the three measurements as the length to cut the side borders. The width of the side border is the finished width you want plus ½ inch for the seam allowances.

- Fold each side border in half lengthwise and place a pin at the fold to mark the center of the long side.
- Mark the center of the long sides of the quilt in the same way as you marked the border strips.
- With right sides together, position the border on the quilt; match the centers, ends and any other important points of matching. Pin at these spots and then in-between as needed to ease in any extra quilt fabric.
- Sew your border in place with an even 1/4" seam allowance. (If you have any difficulty with getting fabric to line up evenly at the beginning of this seam, practice on some strips of scrap fabric. A single-hole needle plate for your machine may help. It may also help to sew onto a small scrap of fabric, and pull that scrap back a bit from the machine, but leave the threads uncut; then lower your needle into the beginning of your border seam and begin sewing.)
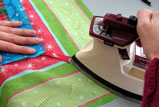
- From the front, place the iron on the lighter fabric and then use the edge of the iron to push the fabric over onto the seam, so the seams go one way toward the darker fabric. By using the edge of the iron and ironing from the front you will not have folds pressed in where you dont want them like you may get if you iron from the back. Steam will both shrink and stretch the fabric, allowing you to adjust the fit where needed.
)
)
- Repeat step #1 above, measuring from side to side including side borders which have already been sewn on and pressed out. This will give the measurement for the length of the top and bottom borders.
- Repeat steps 2-6 above only apply the top and bottom borders to the quilt.
(2, 3) Borders with Mitered Corners
Notes:
- When cutting border from a striped fabric, make sure the design is cut the same way for all four sides.
- Sew multiple boarder strips together first and then treat the resulting striped unit as one single border for mitering.
- Find length to cut borders by following directions below.
Length to cut SIDE borders: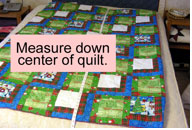
Measure the center of the quilt from the top seam line to the bottom seam line (NOT including seam allowances.) Measure the outside edge on each side from top to bottom. *Use the shortest of the three measurements and write on the first line below.
_____ *Write the length of quilt as figured above. (This length will be the length of the seam line for each side border, step 3c below.)
_____ Multiply the width of the border x 2.
+__3_ Add 3 inches extra for seam allowances and ease of matching.
= Length to cut side borders for mitered corners.
Length to cut TOP and BOTTOM borders:
Measure through the center of the quilt from side to side, NOT including seam allowances. Measure the both the top and bottom from side to side. **Use the shortest of the three measurements and write on the first line below.
_____ **Write the width of quilt as figured above. (This width will be the length of the seam line for the top and bottom border, step 3c below.)
_____ Multiply the width of the border x 2.
+__3_ Add 3 inches extra for seam allowances and ease of matching.
= Length to cut top and bottom borders for mitered corners.
- Cut Borders
- Attach Borders:
- MARK THE CENTER of each side of the quilt with a pin.
- FOLD each border in half and mark the center with a pin.
- MARK the BEGINNING and END OF THE SEAMLINE on each border. by placing a dot or pin at each end of the seam line. This is where it will match the seam line at the corner of the quilt. (*For side borders use the length determined in step 1 above and written in the blank. **For top and bottom borders use the length determined in step 1 above and written in the blank.)
-
PIN each border to the quilt. Match center of border with center of quilt, and length of border pins to corner seam lines. Place more pins in-between and ease as necessary.
Match center of border with center of quilt. -
SEW from one seam line to the other using a ¼ seam allowance. Securing threads by starting and ending with a back-tack. (Viewed from the center section of the quilt, ¼ will be un-sewn at both the beginning and end of each border on all four sides.) Do not press, yet.
End stitching ¼ from edge of corner.
-
Mark the Miter Seam:
-
At one corner, FOLD the quilt with wrong sides together along the seam lines of the borders. The center pieced section of the quilt will be out of the way and the two borders will extend out on either side of the corner with right sides together.

Lay seam lines on top of each other. -
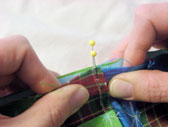
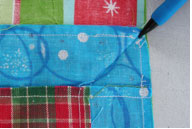
Using a bias square or other ruler with a 45° angle, DRAW A LINE that begins at the inside seam allowance (where you previously back-tacked) and is at a 45° angle to the outside edge of the border. This is the sewing line for the miter. Pin borders together before sewing, taking care to match if using a strip- pieced or striped fabric border.
- TO SEW: Sew on the drawn line, beginning at the inside ¼ seam line and sewing toward the outside edge of the border. Use tiny stitches for the last ¼ or so to secure the end without the thickness of back-stitching.
-
CHECK by opening and looking on the right side to see that:

- there are no tucks,
- stitching comes close enough into the corner but not so close that a tuck is sewn in
- that stripes and /or seams are matched as necessary.
(Width of Light blue stripe is printed unevenly so it will not match)
- TRIM along seam line, leaving ¼ seam allowance.
- PRESS the mitered seam OPEN, and then, from the front, gently press the border away from the center so that seam allowances are pressed towards the border. (Exception: If the border fabric is lighter than the center and will allow the seam allowances to show through when quilted, you may want to press the seam toward the darker fabric.)
- REPEAT steps 3a thru 3f on each of the other 3 corners
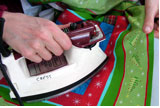
Pressing the seam open Press border away front the center -
)
)
)
)
)
)
)
)
(4) Pieced or Patchwork Borders
Notes:
- Pieced border are unit blocks or portions of unit blocks sewn together in rows and then used as a border.
- Each design unit with in a given border is called a repeat.
- Repeats can be simple, complex, pieced or appliquéd, set on the straight-of-grain, or on the diagonal. They can also be square, rectangular or made of triangles.
Fitting a pieced border to the quilt:
The quilt center must be equally divisible by the measurement of the border repeats. For example, a quilt center that measures 32 could have a border made up of sixteen 2 border units (plus corners), or eight 4 border units plus corners, etc.
Strategies to help ensure that pieced borders fit the quilt:
- PIECE A SAMPLE SECTION of the pieced border and measure to see if your cutting and sewing are yielding the proper dimensions. Make adjustments as necessary.
- USE A PLAIN BORDER between the quilt center and the pieced border. This plain border or spacer strip can fill in whatever space you need. Cut it after the center section of the quilt and the border sections are complete.
To Determine Spacer Strip Dimensions:- Measure the length of the pieced border sections, WITHOUT seam allowances.
- Measure the length of the quilt center section, WITHOUT seam allowances.
- Subtract the size of the quilt center from the length of the pieced border section. Divide the resulting measurement in two. That is the FINISHED width of the spacer strip. Add ½ for seam allowances before cutting spacer strips.
- PLAN OUTSIDE EDGES ON THE BIAS. Some quilters leave the outside edges of complex pieced borders on the bias when there are critical matching points. Bias edges are stretchy and easier to ease in if necessary.
